
Written By Kyle Stockbridge
Apprentice, Boom Box Post
These past few weeks, I must shamefully admit that I’ve been binging seasons of crappy reality TV…Ink Master in particular. There’s a particular sound the editors use in this show that is impossible to go unnoticed. Even if you’ve never seen a single episode of reality TV, chances are you’ve still heard this sound somewhere. It’s of the dramatic, screeching, tension-building stinger variety, commonly found in the horror/thriller genre. One of the most common instruments used to create these styles of stingers is the Waterphone (check out this video from Rob Maciak to learn more about how Waterphones work).
And just like the countless dramatic/horror stingers out there performed by Waterphone, this iconic sound we’re discussing was too produced by a Waterphone. After a bit of research, I was able to find the origin of this iconic sound. It’s titled Waterphone 08 from Voice Crystals’ 1994 Sampler CD titled “Steve Reid - Definitive Percussion.”
Sound familiar? It’s littered throughout early to mid 2000s TV shows like Hell’s Kitchen, Bar Rescue or Ink Master, but is also heard in trailers, low budget horror films and more.
My recreation served as a fun exercise to challenge my technical ability and critical listening skills. Putting new sounds under a microscope and applying my tools to create a replica gives me a better understanding of how to observe and shape different aspects of sound such as timbre, pitch, amplitude, timing, etc.
APPROACH
Here are the main steps I took in my attempt to recreate this sound:
1) Find The Fundamental Frequency/Notes
With dissonant sound sources like metallic instruments, finding the correct pitch of the sound can be less straightforward. The pitches in this sound are G5 and Gb5. I did this by matching the notes on a keyboard, but you can use a spectrum analyzer to find the exact frequency and a chart like this one to be sure of the correct pitch.
2) Find Similar Source Material
This is probably THE most important step in capturing the essence of the original. I spent the most time on this step, scouring my own library for waterphone source material. I searched specifically for long bowed performances that would give me some natural pitch bends. I used the combination of two separate sounds and crossfaded them together. I used the head of one take, and then the reversed head of another to serve as the tail. Again this required trial and error and more pitching to get it in the ballpark
3) Match Pitch of Source Material
Using the Pro Tools stock Pitch Shift Legacy AudioSuite plugin, I matched the pitch of my source material to the original sound.
5) Match Timbre with Distortion and Additional Layers
At this point I felt like the timing, pitch and amplitude shape were all matching quite closely to the original but there was still something off about the timbre. Even though my source material is from a waterphone, the original stinger has a much more abrasive and screeching sound in the front half. To give it more grit, I found an additional waterphone sound with a long sustained note with more of a screechy texture. I pitched and layered this in as well as added harmonic distortion from Avid’s Lo-Fi AudioSuite plugin.
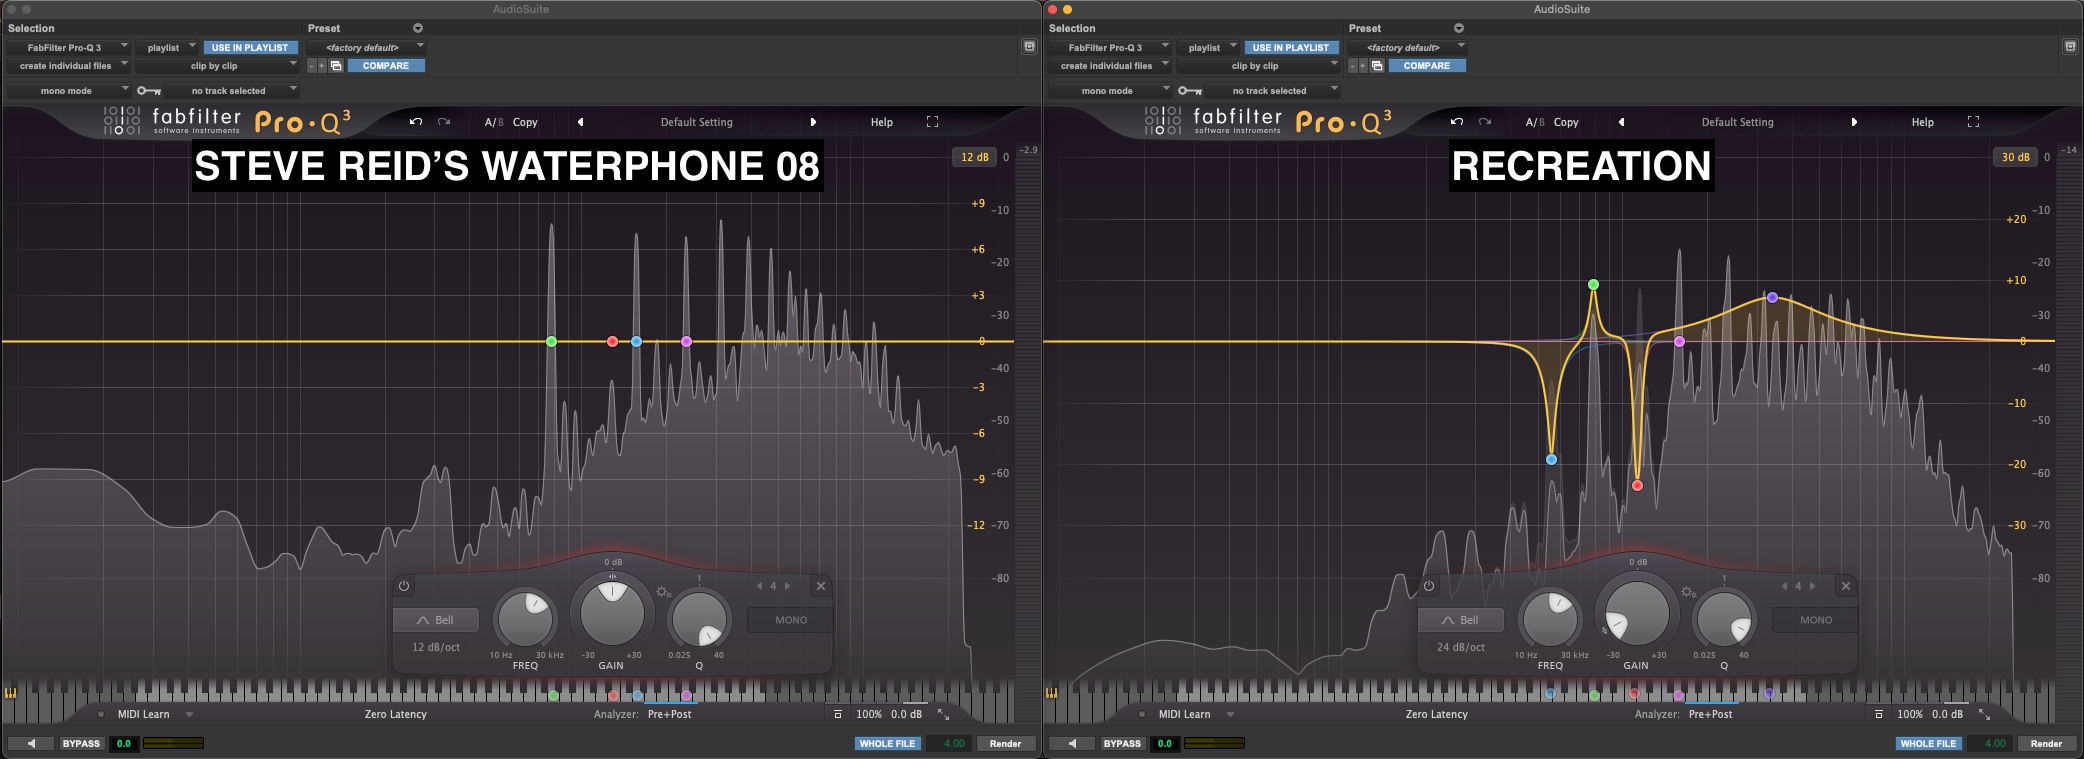
6) EQ Match Head and Tail
Using FabFilter Pro-Q 3, I utilized the freeze function to create a still image of the frequency spectrum from each sound. This allowed me to compare each sound’s frequencies and gave me the power to dip and boost certain frequencies to better match the overall tonal balance of the sound.
7) Use Spectral Editing for Surgical Shaping
Lastly, I put these sounds side by side on the timeline and sent them to RX 9 where I could further analyze and edit them visually. Some of the biggest differences I immediately noticed were:
a) The original had a lot more noisy gain as well as harmonic content in the high and low end than my version, as pointed out by the yellow boxes in the image below. I used RX’s ‘Deconstruct’ module to add noise gain and tonal gain in various areas to better match the original.
b) As seen by the red rectangle, the original has a much different amplitude slope at the front of the sound, which gives it a more abrupt and sharper moment right before the pitch changes. I used a combination of RX’s ‘Gain’ and ‘Spectral Repair’ modules to attenuate these frequencies.
c) The green arrows point out where the tail in Gb5 abruptly transitions in. Not only is it abrupt, but it comes in a bit too early, creating a noticeable deviation from the original. The blue oval shows where this pitch change should occur. It also points out a build up of overlapping pitches not seen/heard in the original.
Again, I used the Gain and Spectral Repair attenuate modules to smooth and shape these transitions to mimic the original.
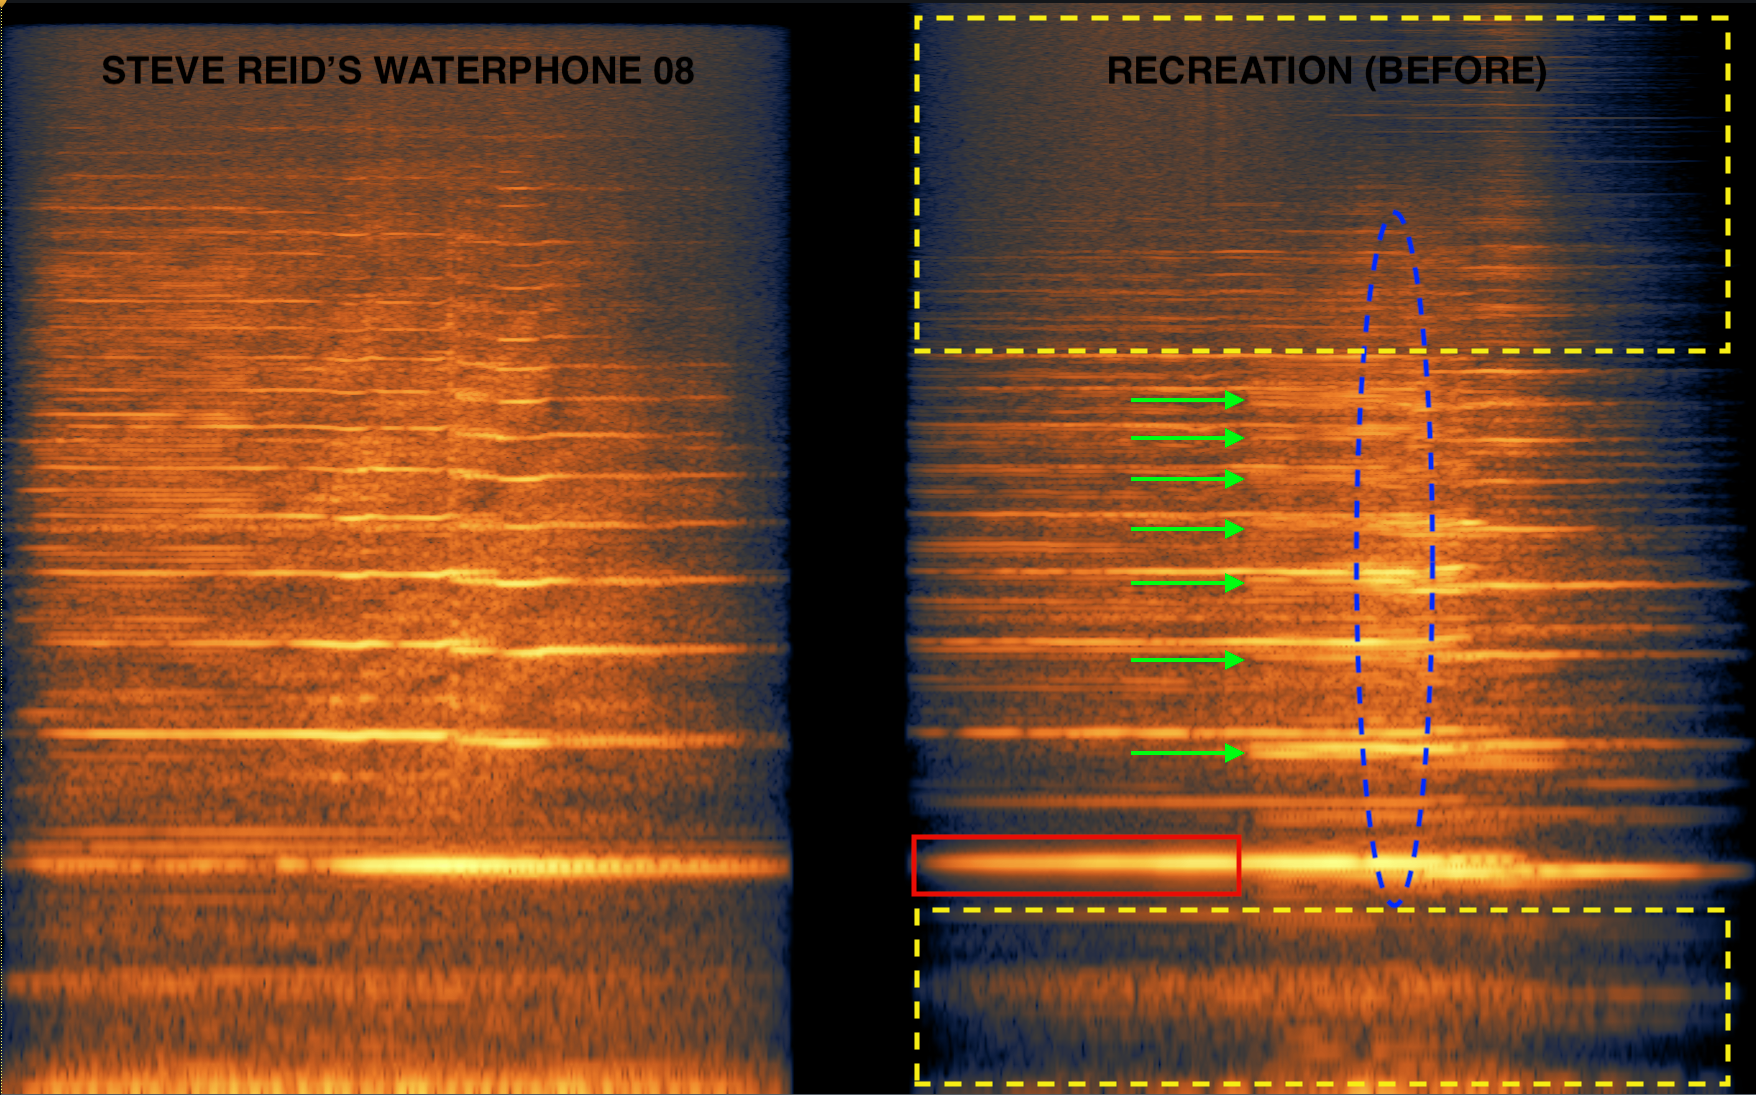
Original stinger on the left side, my recreation on the right pre RX processing
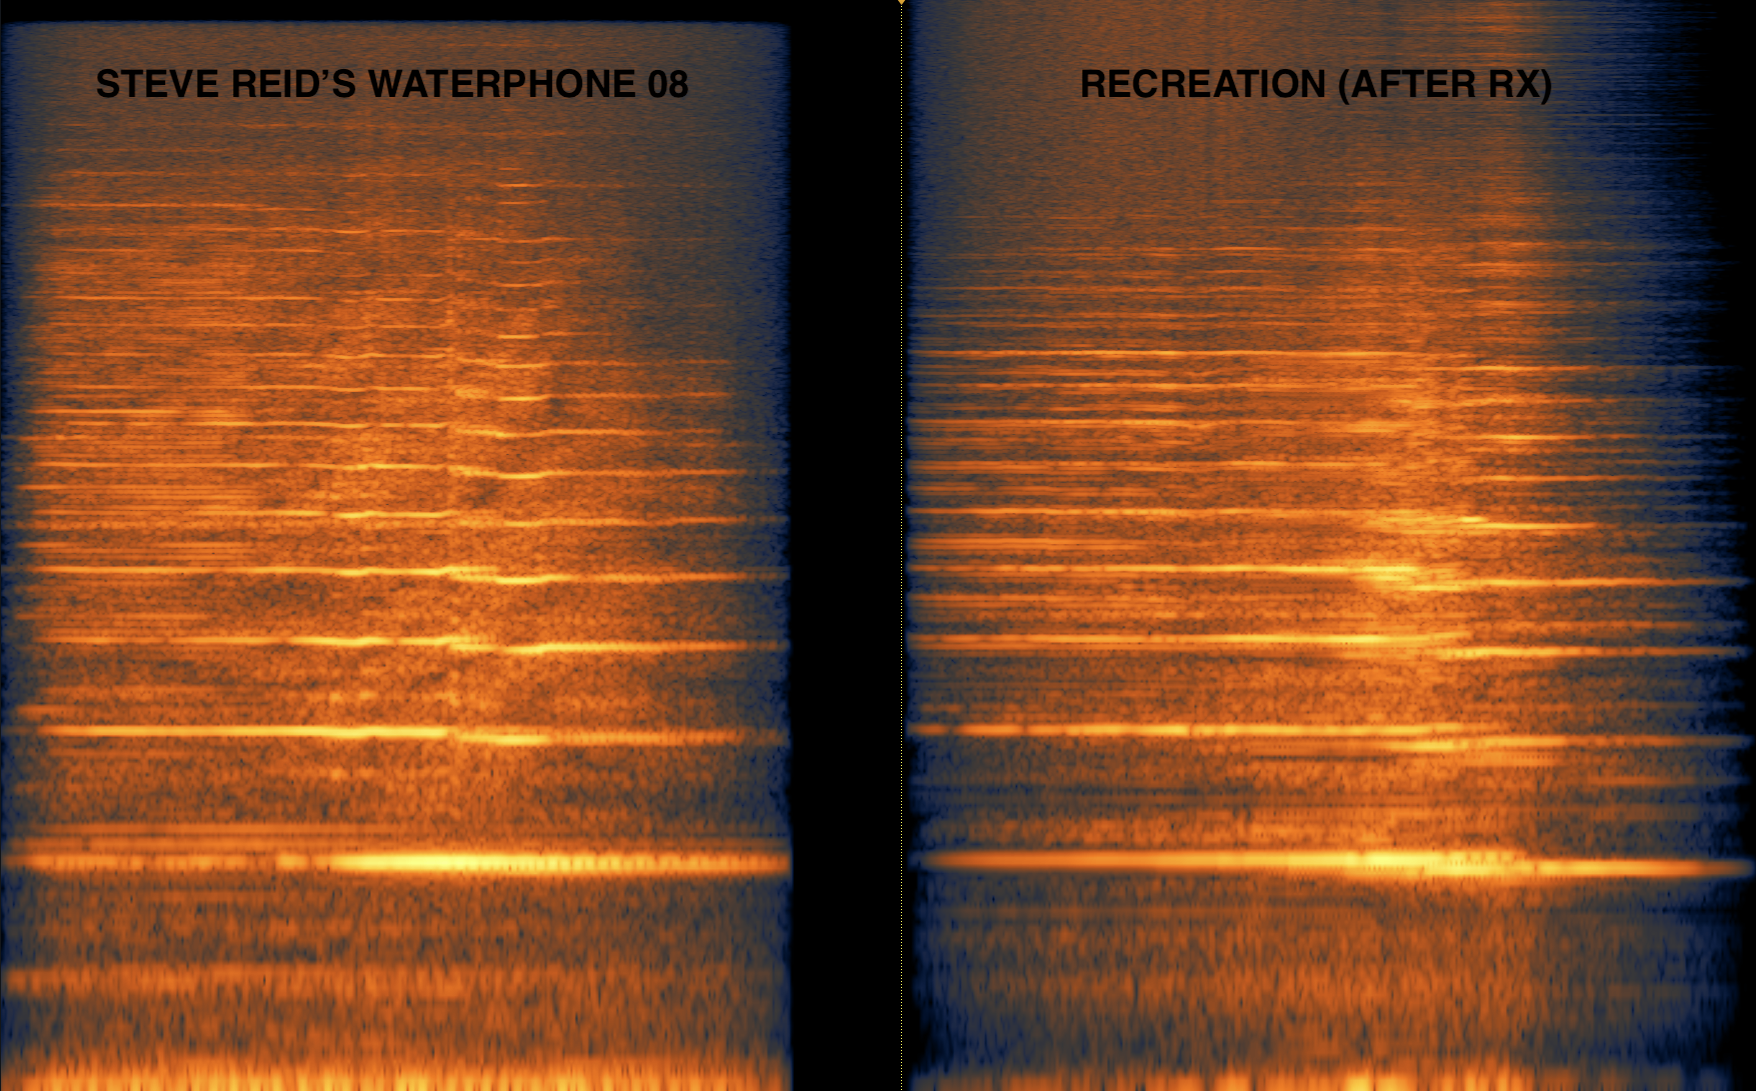
Original stinger on the left side, my recreation on the right, post RX processing
And if you still haven’t had enough of this sound yet, here’s one more goofy edit for your listening displeasure!
If you enjoyed this blog post, check these out:
How To Design: Recreating The Slo-mo Stinger
Lunch and Learn: Recreating A Musical Tune as a Sound Effect
Smoke and Mirrors: Unexpected Sound Sources