
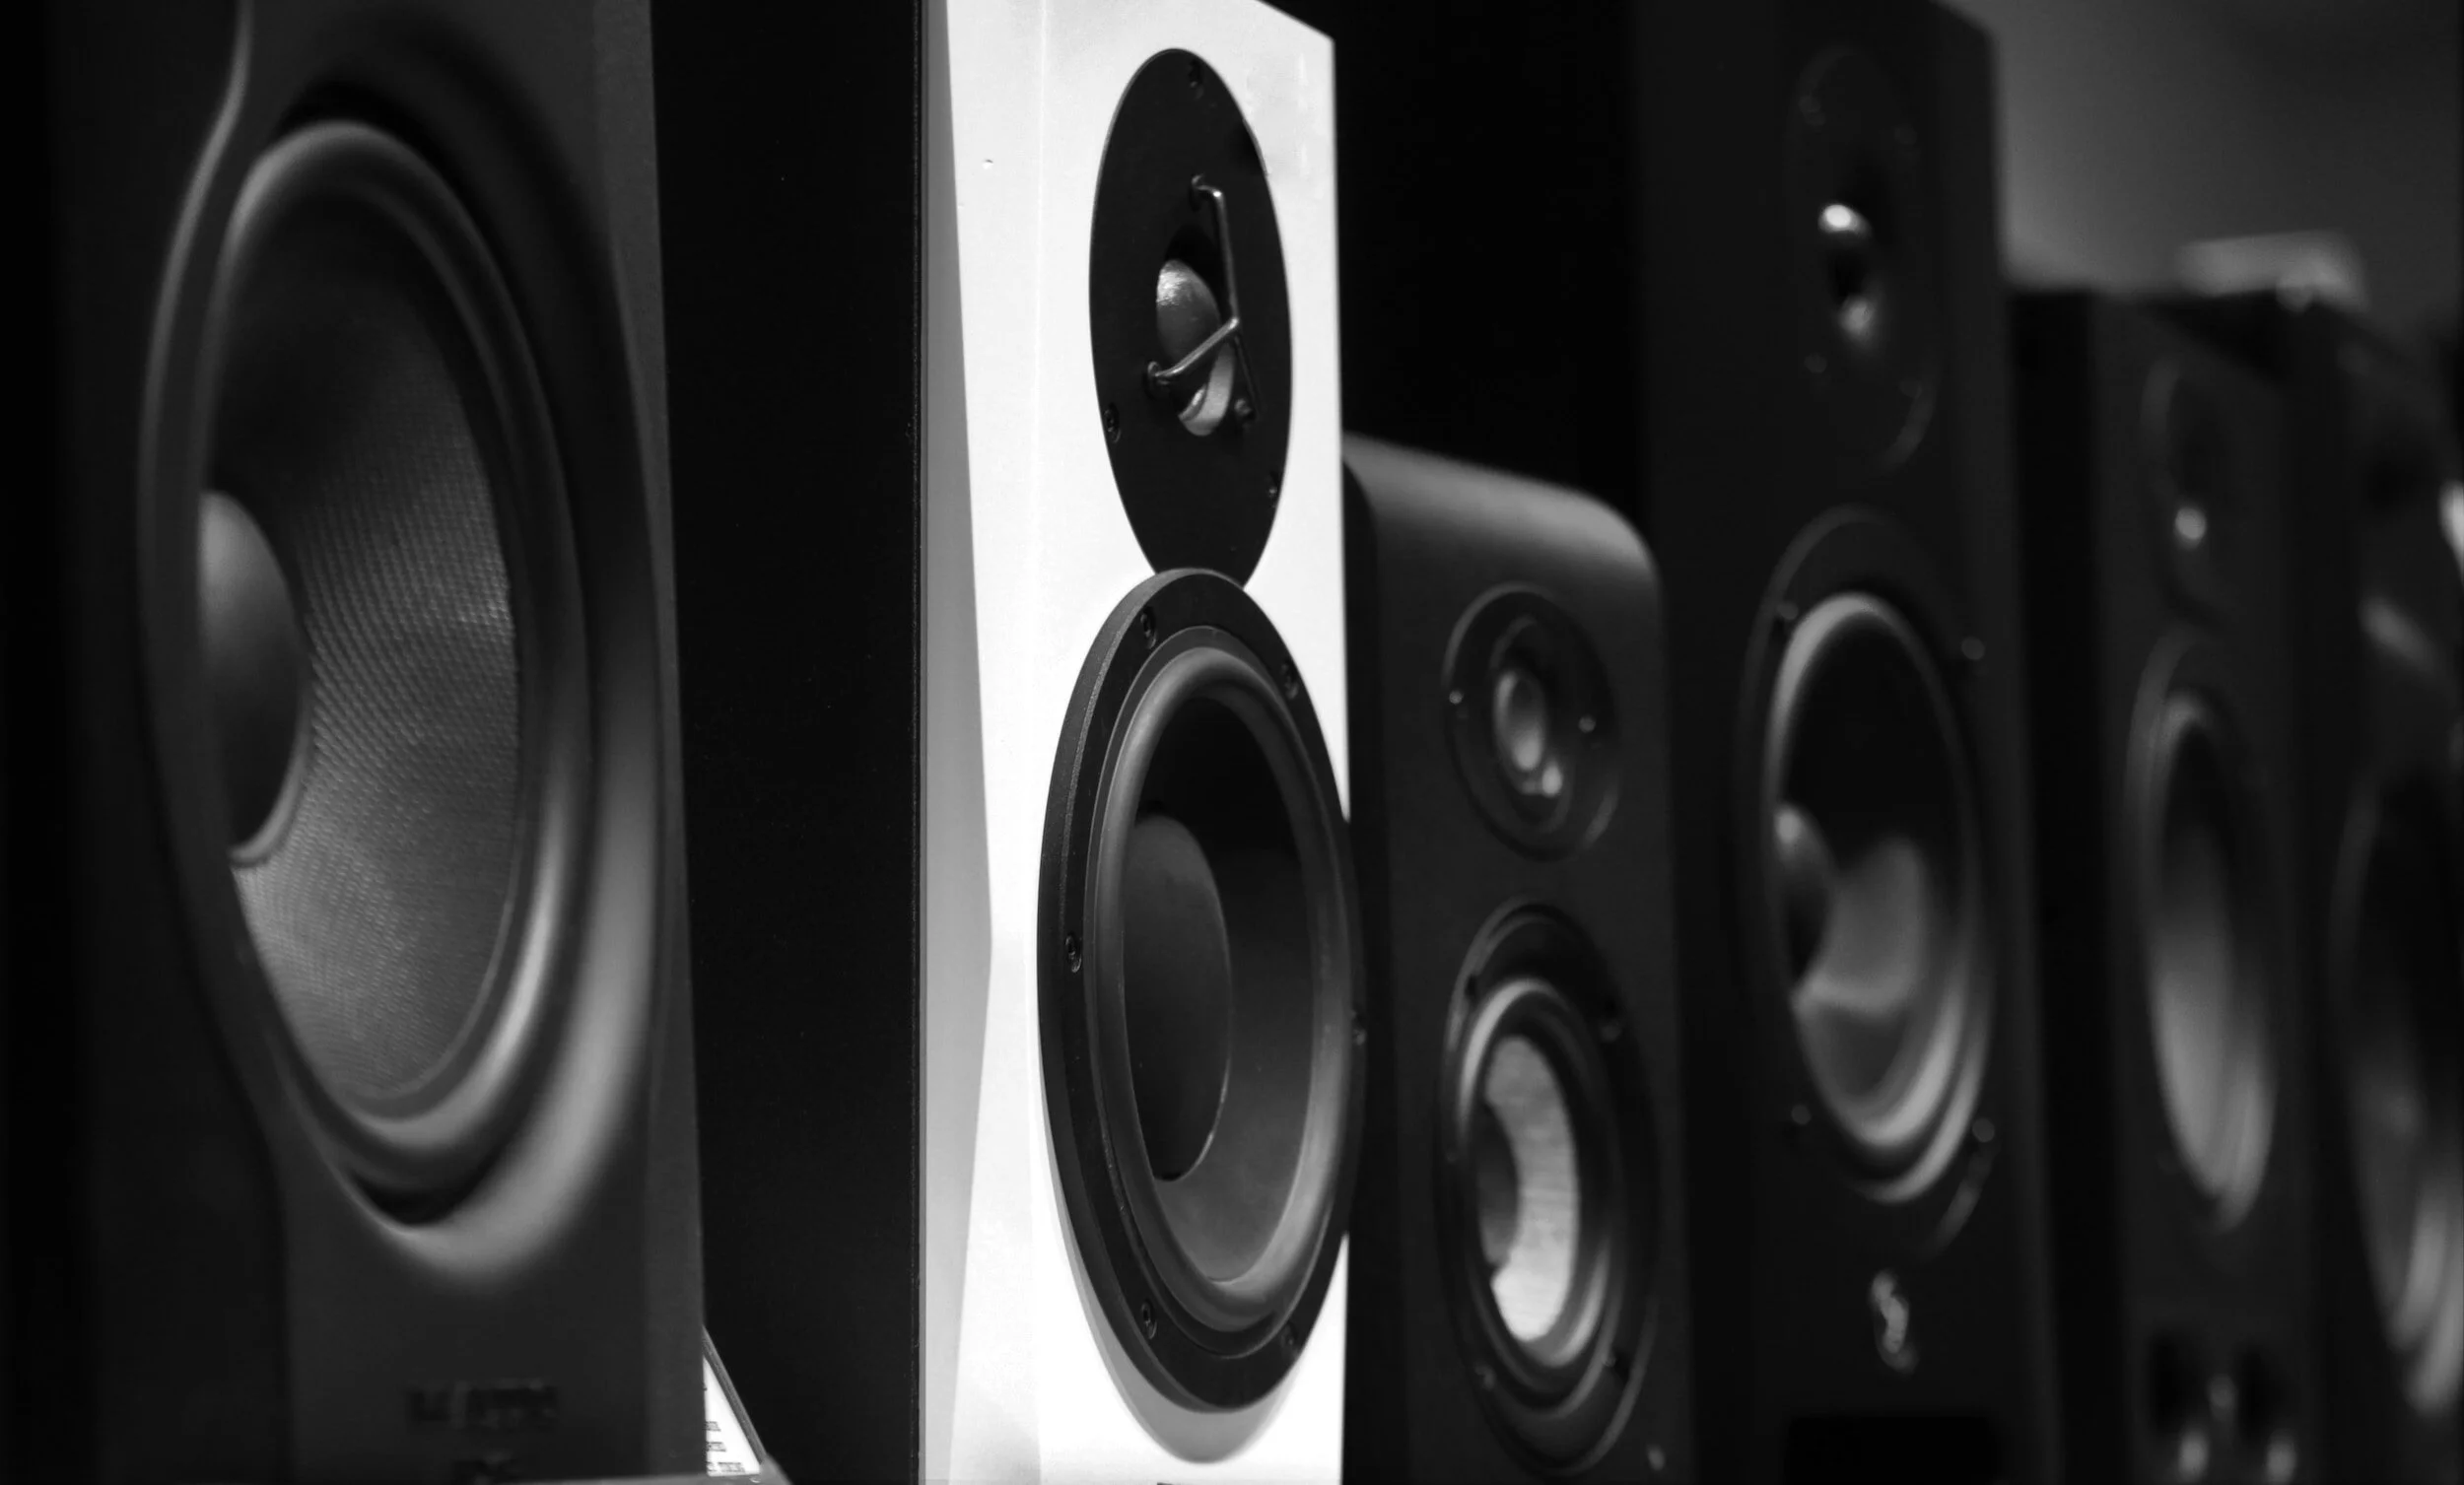

Over the past few years, Dolby Atmos has become an increasingly common format in the industry. We are starting to see more and more movies, TV shows, and albums released in Atmos. What was once originally reserved for Hollywood blockbusters, has now trickled down to smaller scale productions, animation, and even childrens content. Thanks to advancements in technology, Atmos has grown increasingly accessible. Gone are the days when Atmos was a gimmick that could only be experienced in major theaters. With new affordable products such as soundbars, Atmos has been introduced into households across the world.
With such an influx in accessibility comes a demand for Atmos compatible content. Therefore, the ability for studios to execute and deliver Atmos mixes has become more a requirement than a “specialty service.” For example, Boom Box Post first entered the Atmos space in 2020. Since then, we’ve worked on a handful of Atmos projects including: HBO’s Santa Inc., Apple’s Strange Planet, Disney’s Diary of a Wimpy Kid Christmas: Cabin Fever, and the upcoming Netflix Original Exploding Kittens.
GETTING STARTED:
Introducing a new format or skill into the mix (pun intended) is always going to be challenging; however, in this blog post I hope to summarize, outline, and link the basic information needed to get started. Having all this information in one place is something I wish was available to me the first time I opened the Dolby Atmos Renderer.
I’m hoping by providing a general understanding of “what Atmos is”, in combination with an introduction to the basic workings of the Dolby Atmos Renderer, you’ll find the process a lot more approachable.
Please note that if you are at all familiar with Atmos or the Renderer application, this information may only serve as a refresher.
WHAT IS DOLBY ATMOS?
You’re probably used to going to the movie theater and seeing Dolby Atmos as a screening option or in the spec description when scrolling through your favorite streaming service, but what actually is Dolby Atmos?
According to Wikipedia, “Dolby Atmos is a surround-sound technology developed by Dolby Laboratories. It expands on existing surround sound systems by adding height channels, allowing sounds to be interpreted as three-dimensional objects with neither horizontal nor vertical limitations (https://en.wikipedia.org/wiki/Dolby_Atmos).”
The two main takeaways here are:
Height
No horizontal or vertical limitations
KEY TERMS:
Before diving in, I think it’s important to cover a few basic vocabulary words that get thrown around a lot when talking about Atmos. These key terms will be vital when it comes time to set up your Atmos template and begin mixing:
BED
Dolby defines a bed as, “a channel-based premix or stem that includes multichannel panning, and does not need dedicated panning (https://professionalsupport.dolby.com/s/article/What-is-a-bed?language=en_US).”
OBJECT
A discrete audio element that can be placed anywhere in the three-dimensional soundfield (https://professionalsupport.dolby.com/s/article/What-is-an-object?language=en_US).”
DAMF
An acronym for Dolby Atmos Master Format, the DAMF is the master file created by the renderer upon recording/printing in the Dolby Atmos Renderer.
ADM BWF
An acronym for Audio Definition Model Broadcast Wave File. The AMD file is a bounced export of an Atmos mix containing all bed and object metadata.
BINAURAL
“Transmitted through two separate channels to produce a stereophonic effect… a reproduction so that the reproduced sound seems to surround the listener and to come from more than one source (https://www.dictionary.com/browse/binaural).”
GETTING SET UP:
Perhaps the most daunting part of first venturing into the world of Atmos is the initial set up. As you will quickly learn, there are a lot of small steps that need to be followed before you can actually begin working in Atmos. The majority of these steps involve pairing your DAW with the Dolby Atmos Renderer.
Something I found invaluable when navigating this stage of the process were video tutorials on YouTube. Since there is a lot of room for user-error during setup, I highly recommend checking out the following tutorial:
In this user-friendly guide, Sweetwater demonstrates how to link the Dolby Atmos Renderer with Avid Pro Tools. There is a whole checklist of steps to get Pro Tools and the Dolby Atmos Renderer talking to each other, so if this is your first time pairing the two applications I suggest following along:
https://youtu.be/GREyB2DMYvg?si=Tjy21WTpPpd1nj7-&t=174
I/O SETUP:

After the Dolby Atmos Renderer and Pro Tools are linked, the next challenge is configuring the renderer so that it matches your mix template and fulfills any/all of your deliverable needs.
Setting your input configuration is an important step because you can determine what groups your beds and objects are assigned to. This is done by creating custom groups.

Once you’ve created your custom groups, you can assign your beds and objects.

Your input configuration is beneficial to staying organized. It may also help you efficiently troubleshoot any problems that can arise when working in Atmos. For example, if an object goes offline during a mix, you can utilize the input configuration to track down where that object lives in your Pro Tools session based on the group it’s assigned to.
Pro Tools I/O Settings:
It is important to note that in order for the Dolby Atmos Renderer and Pro Tools to work flawlessly together, your renderer input configuration needs to reflect your Pro Tools I/O settings.
I recommend checking out this video tutorial posted by Avid on how to configure the renderer in conjunction with the Pro Tools I/O: https://youtu.be/WsKeZBWqYI8?si=6FCPdmJvqYIfybNi&t=93
Object vs Bed:
Something I found extremely confusing when first learning Atmos was differentiating between an Object and a Bed, which one should be used, and when?
While there will always be some debate based on personal mixing preference, a good rule of thumb when deciding whether to utilize an object or a bed depends on how you want the sound to move within the space.
According to Dolby, “Use a bed for stereo or surround panning. A bed can be thought of as a traditional channel-based stem with the rules and expectations of stem configurations (such as 2.0, 5.1, and 7.1). These are fixed locations in space that are tightly constrained to traditional speaker environments, including theatrical environments where a speaker array might be used (https://professionalsupport.dolby.com/s/article/What-is-a-bed?language=en_US).”
Therefore, if you want a sound to move around your space, Dolby states, “Use objects for precision positioning of your content… Objects can be static or moving and are not constrained to the outside edges of the Dolby Atmos soundfield (https://professionalsupport.dolby.com/s/article/What-is-an-object?language=en_US).”
Still confused? Check out this video for further insight on the topic:
https://www.youtube.com/watch?v=w0JCHPu8b80
Object Control Mode:
Since there are a maximum 128 audio tracks available in the Renderer, it is important to be mindful when creating your template in Pro Tools. For bigger projects, where a large number of objects may be required, understanding the different types of Object Control Modes can be a real life saver. Check out the the diagram below from the Dolby Atmos Renderer user manual:

Creating A DAMF:
Now that the Renderer and Pro Tools are talking, and you’ve set your input configuration in both applications, it’s time to create your master file. Creating a DAMF is easy. Simply select File > “New Master File…”
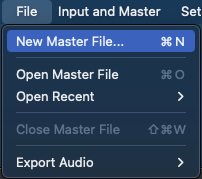
Label the file in accordance to your project specs and choose its file directory.

It’s important to note that this will only make a folder for your project. The DAMF will not be created until you begin recording/printing your mix! You’ll know you’ve successfully recorded and created a master file when you are able to toggle between input and master sources in the renderer application.

Recording/Printing:
Printing your mix is as easy as setting an in/out timecode and enabling the record button.


Exporting Deliverables
In my opinion, the best part about working in the Dolby Atmos Renderer is creating deliverables.
The Renderer makes creating and exporting stems incredibly easy. Need a 5.1 or stereo downmix? The Renderer does all the work for you. In fact, practically every output configuration you could possibly need when delivering a mix is available to you within the Renderer application.

Within the Rerender window, select the desired stem output format.
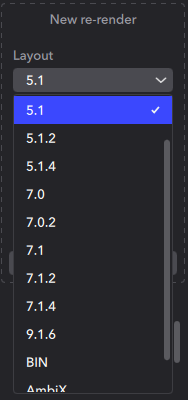
Here you have the option to select all bed and objects (full mix), all beds, all objects, or custom groups. Any number of custom groups can be selected for a single rerender. This is where our initial input configuration setup comes in hand. If we were organized and methodical when configuring the renderer in accordance with our deliverable requirements, exporting discrete stems (rerenders) is as easy as selecting their assigned group.

Need addition help? Check out this video tutorial:
https://youtu.be/PQvS55p8eXE?si=w1A22ztQDo8kUxn0&t=188
I HOPE YOU LEARNED SOMETHING!
While there is still so much left to learn, I hope this post has made your introduction to Dolby Atmos and the Dolby Atmos Renderer a little more approachable. By having a basic understanding of this knowledge, you are already miles ahead of where I was the first time I opened the Renderer.
If you enjoyed this blog, check out these:
LUNCH AND LEARN: CHILDREN’S ANIMATION VS. ADULT ANIMATION
DEATH BY [SOUND EFFECT]: A HALLOWEEN SOUND DESIGN CHALLENGE PART 2