

Written by Kyle stockbridge
office administrator of BOOM BOX POST
So you’ve just recorded the coolest sound out in the field, but it’s buried underneath environmental sounds like distant cars, planes, humans, birds, insects etc… How do we isolate our sound and minimize that background noise? This is not another Izotope RX post. Instead we’re going to talk about a common yet often forgotten audio processor that can help reduce your noise floor and make these recordings more usable.
Spectral editors like Izotope RX are among the best tools to target and reduce static broadband noise effectively. But what if we don’t have access to RX? And even if we do, noise reduction modules struggle when the environmental noise becomes more animated and dynamic. In my case, I’ve just recorded some beautiful Great-horned owl hoots, but the hoots are buried under car revs, piercing crickets, distant conversations, human commotion and more. To isolate the the owl hoots in RX, I’d need to get surgical. But what about a tool that simply turned up the volume when the frequencies of our sound plays and lowered the volume when they’re not? This is exactly what multiband expansion can do for us.
What is multiband expansion?
We commonly use compression in our work to control dynamic range, often turning the loudest sounds down. Expansion can be thought of as the opposite of compression in that it increases the dynamic range: making the quiet moments quieter, loud moments louder. With that principle in mind, if our noise floor is quieter than the signal we’re recording, we can use expansion to help us push the noisy sounds down and turn our desired sounds up, giving us a more focused result.
Why do we need “multiband” expansion? Since environmental noise is broadband (spanning the whole frequency range), and our sound may only cover a small range of frequencies, its not very helpful if we turn up the whole frequency range the moment our sound plays. In my case, when the the owl hoots, its energy spikes in specific frequency bands. When it stops, those same bands return to noise. Multiband expansion can turn up those frequencies when they rise above a specified threshold and turn them back down once they drop below the threshold. Let’s see how it works.
Demonstration
For this demo I’ll be using a combination of Waves WNS and FabFilter Pro-Q 3. However, any multiband dynamics tool can achieve this technique (TDR Nova, FabFilter Pro-MB, Avid Pro Multiband Dynamics, Waves C6, to name a few).
Below you can compare the raw recording to the final cleaned up file:
Step 1: Identify the frequency range of your sound
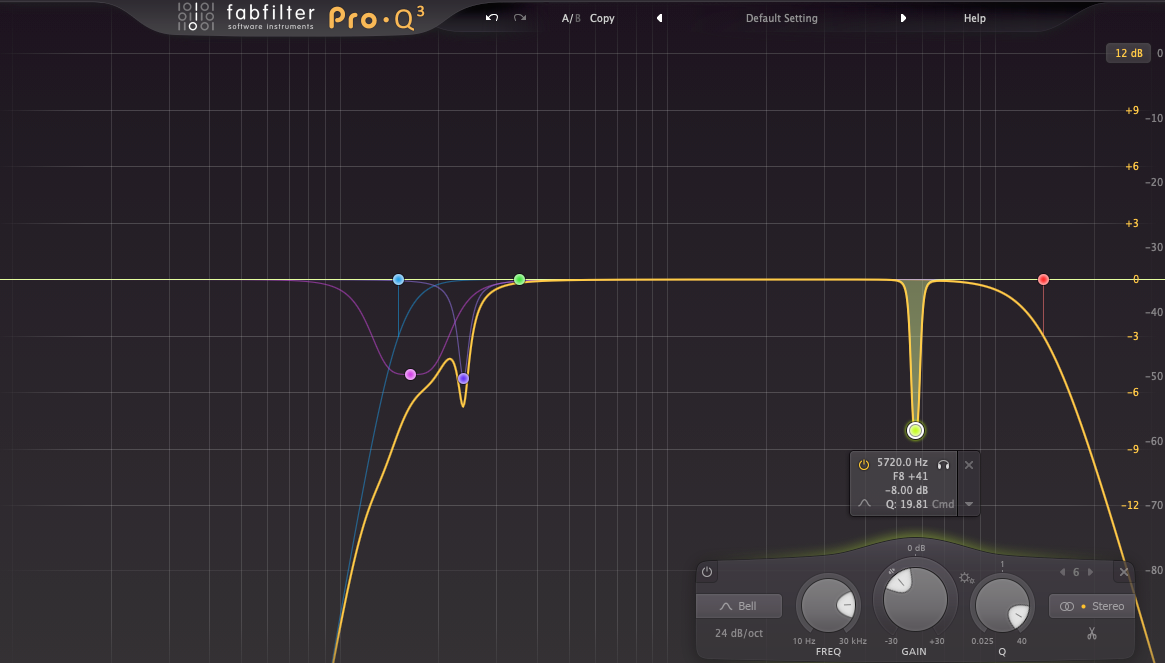
Where do we start? For me, it was identifying the frequencies of the owl hoots and using an EQ to reduce signal in the frequencies we didn’t need. I did all my processing on track inserts, starting with this EQ curve below. This targeted the crickets around 5.7khz and cut into the low traffic hum up to about 200hz.
Step 2: Multiband Expansion with waves WNS
Waves WNS is marketed as a dialogue noise suppressor, but it’s great for reducing noise on sound effects too. Diving into the settings of the Waves WNS is beyond the scope of our post, but here’s a video you can check out while we talk about the basic approach.
Similar to feeding RX a noise profile (like room tone), I played a looped section of the background noise for WNS. This reveals the frequency curve of the noise, and I pulled the faders of each frequency range down to match the curve. This control allows us to dial in how much reduction or “suppression” we want. Next I use the threshold fader (left side of plugin) to set how the suppression is reacting. I keep saying “suppression,” as this is how it’s marketed, but really what we’re doing is multiband downward expansion. We’re making these quiet moments below the threshold QUIETER. Once the owl hoot plays, each frequency band reacts to the content within its range and if its above the threshold, it allows the sound through!
Step 3: multiband expansion with Dynamic Eq
FabFilter Pro-Q 3 and higher allow for dynamic processing of their bands. This is where I can apply the same principles as the WNS but get much more surgical, targeting very specific frequency ranges, independent threshold settings per band, filter shapes etc. Take a listen below and watch how the Dynamic EQ is reacting!
You can hear that we’re not 100% clean just with these three processors alone, but we’ve already carved out the large majority of the unwanted noise. In my opinion these are ready to save as your own sound effects for your library. But if we want to make them commercial library ready? This is when jumping into a spectral editor can be helpful to target frequencies on a granular level.
Thank you for reading! I hope you learned something in this post to take to your own recordings.
If you enjoyed this blog, take a look at these:
Top 5 Tips for Recording Sound Effects like a Pro
Recording Terracotta Pots
Recording A Vintage Pinball Machine