

Written By Carol Ma
Foley Editor, Boom Box Post
Digital Foley techniques can become an extremely powerful skill for an editor’s toolbox, amplifying your work to the next level. Working in episodic television, it is sometimes tedious and overwhelming to create libraries and carry Foley elements from one episode to the next. Listed below are a few quick tips that I use when editing Foley to speed things along and keep everything organized.
Loading Multiple Foley Libraries
Having worked on Foley for a fair amount of shows in my years, there are times where the libraries of certain shows are just ridiculously large. Kontakt will give users about 64 instrument slots per active plug-in. For the most part, this is more than enough for a show, but for some, we might need more. The easiest solution is to create more than one multi-library divided by categories - for example, main characters vs minor characters, humans vs non-humans, etc.
Now armed with multiple “multis” necessary for the show, the next step would be to load in multiple Kontakt plug-ins onto the instrument track in Pro Tools. Each Kontakt plug-in can then be loaded with the different multis that were previously created for the show.

The final step of this process is to pop open the “Instrument” column in the edit window in Pro Tools and select the proper Kontakt plug-in that is needed.


In order to get a successful signal, all other plug-ins will need to be bypassed (hold the command key and click on the plug-ins to bypass them).

This simple routing trick is useful for switching between foley collections without having to constantly unload and reload new libraries.
Major Surface Swaps
When working on a show, every now and then I will edit to an episode that is not fully rendered. Regardless, it needs to get done and the only options are either to ask the supervisors or play “guess the surface.” Sometimes, the picture will be fully rendered but the surface will magically change. While we work with MIDI data to reduce the workload when changing surfaces, it’s still a tedious task that is not very enjoyable, especially when there are multiple characters that need to be redone.
The most straight-forward method is to record-arm your audio track, move the samples to the designated place in Kontakt and hit record. This is a completely valid option. However, a much more efficient method that I’ve recently discovered is using the event operation window (Option + T) to transpose MIDI data. If you design your patches to have different surfaces happen at each octave, you can transpose the MIDI this way to the proper surface. The best part is, when you then drag that MIDI onto an audio track, Pro Tools automatically renders it to audio, saving you all that real-time recording.


This method makes it a bit easier, and you don’t have to watch the same scene multiple times in order to get every character on the same surface.
Creating a Set of Footsteps with One Audio File
Although we have quite an extensive Foley library and sound library in general, there are times when I have some trouble finding a walk sequence I like to cut into samples. This happens a lot more frequently when walking non-human characters. When working with just one or a few sounds for Foley, it can sound monotonous and becomes less like a walk and more like a metronome. A solution to this minor inconvenience is to pull the audio file into Kontakt and customize your own walk cycle. Start by editing the audio file into a sample, and then pull it onto a key in Kontakt. Then, make a duplicate of the sample and pull it onto another key. Following this step, pitch one of the audio files up or down a semi-tone.

More often than not, footsteps don’t have an identical sound when walking due to the shifts in weight, but they do sound extremely similar. Pitching one audio file makes it sound different enough to be one left foot and one right foot rather than a person hopping on one foot.
An added step to give the walk cycle even more variety, is to add an LFO to the whole instrument (thanks to our supervisor Tess for teaching me this years ago!). To do so, find the tune knob located in the source box in Kontakt.

Right click on the knob, to list available modulators. Hover the mouse on “LFOs” and select the random option. his neat little trick comes in handy when there are limited sounds that can be used to create whole walk cycles.
Fixing Old Samples
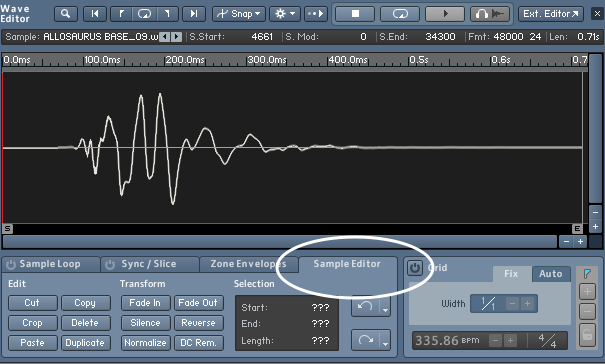
What if you have some samples that don’t exactly land on the transient? This can make walking foley very difficult. To fix a sample with too much air at the head, use Kontakt’s wave editor window.

The easiest solution is to grab the green start bar with the mouse and move the bar to the beginning of the sound.

An alternative option is to go to the “sample editor” tab in the wave editor window. In this window, cutting/cropping/fading can be applied to the audio file. Simply highlight the region to edit and select the options in the sample editor tab.
After making your edits, Kontakt will generally send a notification about having volatile samples from destructive editing. From this point the best solution would be to save your edited samples (if you want) for future use.

These are some solutions I have come across as I have problem-solved in my editing. For more digital Foley tips, check out this previous post. It details a very useful signal flow trick for Kontakt. It saves a lot of time when having to do multiple layers of footsteps.
If you enjoyed this blog, check out these:
CHARACTER DESIGN THROUGH FOLEY
LUNCH AND LEARN: OBJECTIVE-BASED MIXING
LUNCH AND LEARN: RECREATING A MUSICAL TUNE AS A SOUND EFFECT