

WRITTEN BY Vivian Williams
Sound Editor, BOOM BOX POST
Everyone knows that the key to becoming a quicker editor is learning and utilizing keyboard shortcuts, but Pro Tools is such a powerful piece of software that even the most seasoned editors or mixers might not know all the keyboard shortcuts that can help speed up their workflow. Hopefully after reading this you can walk away with at least one Pro Tools tip or trick you didn’t know before.
Mac to Windows Translation
I will be using Mac terminology from here on out, but here is a quick refresher on Mac to Windows keyboard translations.
Command (Mac) = Control (Windows)
Options (Mac) = Alt (Windows)
Control (Mac) = Start (Windows)
Common Shortcuts
First let’s make sure you have these common commands memorized.
Holding the command key while editing changes into slip mode from grid and vice versa. This can be really helpful when you need to get granule with slip mode but just for a moment.
Tilde (~) - cycles through slip, grid, shuffle, spot modes.
Shift + Spacebar - plays back the session at half speed
Shift + Option + Mouse Wheel – increases and decreases waveform size.
Command + T – deletes a clip except for highlighted selection
Option + A – zooms horizontally to show all clips
X
This gets its own section because of how important it is that you utilize this. X functions as cut. However, I use it more frequently as a delete function.
If you are using the delete key still, stop! Using the delete key means you’re constantly lifting your left hand from its ideal shortcut positioning on the keyboard. The only time I use the delete key over X is when I have something queued up that I’m planning on pasting, as the X key will effectively cut the selected clip and overwrite whatever is in your pasting queue.
Zoom Memory
Stop abusing your R and T keys! Zoom memory allows you to save a zoom to a corresponding number on your keyboard. Do this by zooming into your desired zoom distance using the R and T keys then hold command and click one of the numbers circled in red below.

Now when you press the corresponding number on your keyboard, you will zoom to that view! This may seem like a small thing, but trust me, if you can learn to use this you’ll be saving a lot of time from avoiding pressing those R and T keys 3 million times a day.
Strip Silence
Command + U – strips silence
This removes the areas of the clip that don’t have any sound. This works great for things like footsteps and wing flaps. Instead of individually cutting each sound, just use strip silence and do it all in one go!

Copying and Pasting Automation
If you need to copy over any and all automation without copying the clips themselves use the following:
Control + Command + C – copies ALL automation settings
Control + Command + V – pastes ALL automation settings
Jump to Track
Control + Shift + Click on a track in the edit window scrolls mix window so that selected track is first track in view and simultaneously makes this the top appearing track in your edit window as well.
This is super helpful when you want to automate something on a specific track. When you pull up your mix window you might be looking at track 1 when you need to be at track 60. Instead of scrolling for a millennia, just control shift click the track in the edit window and viola! It’s the first visible track in your mix window!
The Numeric Keypad
The numeric keypad is a great resource for listening to you project using “playback mode.” By pressing and holding 1 on the numeric keypad you can rewind and similarly pressing 2 can fast forward through your session.
Pressing Control + 1 - 9 plays back the session at different speeds (1 being the slowest speed and 9 being the fastest.) Using the + and - keys determine the direction of your playback, forward or reverse respectively. Pressing the 0 key on they numeric keypad stops playback. To commence playback simply press any other number on the numeric keypad. Finally, spacebar will exit playback mode completely.
Fades
Option + Control + Left/Right Arrow – changes fade shape for selected fades
Highlight clips with fades + Right Click + Delete Fades – deletes fades for selected clips. I find that using a custom keyboard shortcut for this function is extremely useful.

To change your fade presets simply press Command +F and then Command + Click 1 - 5 (circled in red below).
There are some important things to remember when making your fade presets. Do you want to adjust existing fade in shape/slope/length (If this is checked you will overwrite any previous fades when you press the F key on the selected clip) and how long would you like your fades to be? (40 milliseconds is a 1 frame fade).

Nudge Data Within Current Clip
Control + Plus/Minus keys – nudges data within current clip to right or left by set nudge values. This keeps the clip start and end at the same location and moves the underlying audio instead. Below is an example of a clip before and after nudging the data of a clip. Notice that the clip lengths are completely the same and the fades also did not change in length or position, but the visible wave lengths all shifted to the left.

Before using Control +

After using Control +
Trim Clip Edge
Option + Plus/Minus keys – trims left edge right or left by your nudge value.
Command + Plus/Minus keys – trims right edge right or left by your nudge value.
Pro Tip, by adding the shift key to either of the above commands allows you to adjust the selection boundary instead of trimming.
If you need to trim a clip up to an adjacent clip without going over the adjacent clip simply hold down the control key while trimming!
Clip Gain
There are a lot of clip gain short cuts but luckily they all include Control + Shift so remember Control + Shift equals clip gain.
Control + Shift + Hyphen (-) – shows and hides the clip gain line.
Control + Shift + Equals (=) – shows and hides the clip gain info.
Control + Shift + Up/Down Arrow – nudges selected clip gain up or down. (Control + Shift + Scroll on mouse – moves clip gain as well)
Control + Shift + B – clears clip gain back to 0.
Control + Shift + X – cut clip gain (will reset clip gain to 0).
Control + Shift + C – copy clip gain (clip gain on copies clip remains the same)
Control + Shift + V – paste clip gain
Track Height Resizing
Control + Up/Down arrow keys – resizes selected tracks bigger or smaller.
Control + Option + Up/Down arrow keys – resizes all tracks bigger or smaller.
Warning if you use a Mac you must uncheck this automatic shortcut in the mac preferences so it doesn’t override the Pro Tools shortcut. You can do that by going to the following windows on your Mac computer System Preferences/Keyboard/Shortcuts/Mission Control

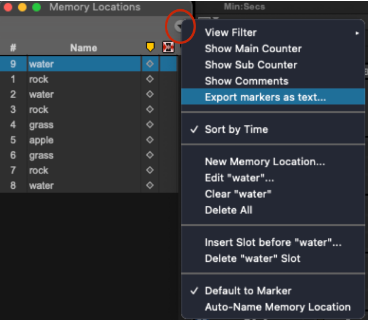
Exporting Markers as Text
I use this often when I want to do a large pass on something (i.e. I want to cut all cloth pats throughout an entire movie). I also utilize this when making markers for footsteps throughout a movie. Here are the steps to do this -
Go to your memory locations window (command 5 on the numeric keyboard), click the drop down arrow, select “Export markers as text…”
Right click on exported document and open with numbers (pages/word will also work)
All your markers will appear in a table. Right click on the column with marker names and select “sort ascending”


Now you’ve got all those same markers lined up for you. You can jump to those markers in your session by typing the following on the numeric keypad - Period (.) + marker number + Period(.)
Something to keep in mind when doing this is using good naming practices. I start with object first always. For example labeling as “cloth pat” instead of “pat cloth” that way when I alphabetize the markers all the cloth markers are together in my table. I utilize exporting markers as text often when marking up footsteps as well. I make sure to label as followed - Shoe, Surface, Description. For this example I’ve labeled all my shoes s1, s2, s3, s4 thus this labeling practice would look like “s1 wood john” or “s6 tile joyce”. Then when I alphabetize, all the same shoes and surfaces are grouped together and I can run through those shoes and surfaces all in one go without having to change shoes or surfaces. This is a HUGE time saver.
Plug In Settings
This is entirely up to preference, but I’ll explain my personal preferences when it comes to plug in settings. I set the dropdown menus in the top left corner of the plug in to “create individual files” and “clip by clip.” This will keep your fades and clip gain in tact after rendering instead of having the new rendered clip set to 0.

I hope you learned something!
These were just some of the many functions, shortcuts, and workflow tips that Pro Tools offers, but there are many more I didn’t touch on. I would suggest trying some of these shortcuts out to see if they are helpful in your Pro Tools workflow. Remember though to give yourself sometime to adjust to these shortcuts or functions before you definitively decide against integrating them into your daily workflow. They might feel awkward or unintuitive at first, but given some time they can drastically cutdown your working time. I also highly recommend making your own keyboard shortcuts for commands or functions that don’t already have shortcuts. Jeff wrote a blog post that goes into how to create your own shortcuts that is extremely useful!
If you enjoyed this blog, check out these:
LUNCH AND LEARN: HOW TO PROPERLY ADDRESS CLIENT NOTES
LUNCH AND LEARN: DESIGNING CUSTOM SOUND EFFECTS FROM A LIBRARY
LUNCH AND LEARN: THE BASICS OF WEAPONISER