

WRITTEN BY ZANNE HANNA
OFFICE MANAGER, BOOM BOX POST
When I hear telemetry, I’m reminded of the music of twentieth century Austrian composer, Arnold Schoenberg. He used a style called Serialism, which took a mathematical approach to developing melodies and rhythms and focused on atonality. He developed a technique called the tone row, which takes the twelve chromatic notes of a scale, and places them in a random sequence. The sequence is then manipulated by flipping it backwards and turning it upside-down. This develops into a chaotic composition with a melody that is difficult to follow, much like a typical telemetry loop in a sound library.
I decided to challenge myself to create my own telemetry using the methods of the tone row that I learned in school. To make it more challenging, I used only stock plugins from ProTools AudioSuite. This way, I could maintain the methodical nature of the music style in my own designing.
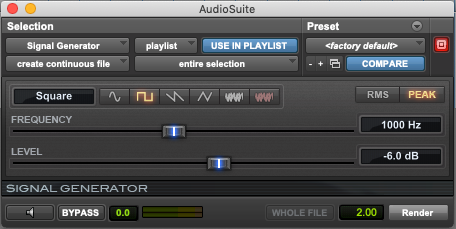
To start, I highlighted four frames in a blank audio track in ProTools, and I opened the Signal Generator from the Audio Suite drop-down menu. I rendered a 1000Hz square wave because the odd harmonics of the square wave gave me a strong basis for a sci-fi technology sound, reminiscent of a telephone beep.
Next, I made twelve duplicate tracks of the signal to represent the twelve tones, and I spaced out the clips evenly, each overlapping by one frame for a mono-rhythmic effect. To start my tone row, I typed the numbers 1-12 in random order in a blank document. This is what I came up with for my prime row:
5, 8, 3, 10, 2, 4, 6, 9, 11, 12, 7, 1
These numbers translated to the semitones I assigned to my twelve square wave clips using Pitch II in AudioSuite. I selected my first clip, pitched it up by five semitones, and rendered the clip. Then I selected the second clip, pitched it up by eight semitones, and rendered. I did this process for all twelve of my “notes” to follow the semitones I randomly listed above and create my prime row.

The next part of the tone row is to repeat the notes backwards to make the retrograde row. For this part, all I did was copy and paste each clip in an ascending stair-stepping order along the same tracks. My entire session looked like a capital V, and the clips were mirroring each other. For reference, the semitone values of my retrograde sequence looked like this:
1, 7, 12, 11, 9, 6, 4, 2, 10, 3, 8, 5
The following part of the tone row is to invert the sequence. To achieve this, I found the distance between two notes, and replicated that distance in the opposite direction. For example, the difference between my first note at semitone 5 and my second note at semitone 8 was -3 semitones. So in ProTools, I copied and pasted the first note onto the second note’s track. I opened Pitch II again with the second note selected, and I set the semitone to -3, and rendered the clip. Then, I copied the clip I just made onto the track below it, and followed the same process with my next equation.
My inversion calculations looked like this:
-3, -5, +7, -8, +2, +2, +3, +2, +1, -5, -6
The final part of the tone row is to create a “retrograde inversion” of the last sequence. To start this sequence, I copied and pasted the first note of my retrograde sequence, which was semitone 1. When I inverted this sequence, I referenced the equations from my retrograde line. So, for my first inversion, the difference between semitone 1 and semitone 7 was 6. In ProTools, I copied and pasted the clip of semitone 1 onto the track above it, opened Pitch II, added 6 semitones, and rendered that clip. This was then the same process as the inversion, just following these new calculations:
+6, +5, -1, -2, -3, -2, -2, +8, -7, +5, +3
At this point, my session looked like a capital W, which I looped and joined for the next part of the process, like this:

The square wave tone row sounded like this:
Once I completed my tone row, I was ready to move on to the telemetric design of the project. I used the AudioSuite Sci-Fi plugin to process the square waves two different ways. For the first part of the processing, I used the Sci-Fi plugin’s ring modulation via the Sample and Hold method, and I set the modulating frequency to around 3000 Hz. This gave me a nicely spaced out, randomized beeping sound that developed the foundation of the telemetry.
For the second part of the processing, I created a grittier, dirtier modulation with FM synthesis in the Sci-Fi plugin, and I set the modulating oscillator to around 300 Hz. I further processed that with Mod Delay III, created a “chorus” effect at 15 ms and, and I used the built-in LFO to modulate the delay. This created more of a chaotic and alarming sound.

Finally, after writing out my perfect tone row and playing around with the Sci-Fi plugin, I combined my processed tracks to create this design:
While I had fun with this challenge, I can’t say that I would ever do it again. Maintaining the methodical integrity of the musical style led to an over-complicated design process. Still, I can’t help but think that The Second Viennese School is smiling down on me, happy to see this obscure invention is still in use today.
If you enjoyed this blog, take a look at these:
FOCUS ON THE CREATIVE: TESS FOURNIER ON RETRO FUTURE-TECH
LUNCH & LEARN: CONVOLUTION REVERB AND IMPULSE RESPONSES
SOUND EDITING WITH MUSIC IN MIND