

WRITTEN BY KATE FINAN, CO-OWNER OF BOOM BOX POST
When asked by Plugin Alliance to test their newest noise reduction/reverb removal plug-in, accusonus ERA-D, my first thought was that de-noise/de-reverb is possibly the least sexy category of plug-in on the market.
However, I have to say that after putting accusonus ERA-D through its paces, it is, in fact, quite sexy.

I'm tempted in this review to tell you to simply buy it and turn the two main knobs (de-noise and de-reverberation) up and down, because it's just that easy. Its first selling point is certainly that it is the best-sounding de-noise/de-verb plugin-in I've used and it also is the most user-friendly. The simple fact that you do not need to sample the noise cuts out a huge amount of time, frustration, and user error. The plug-in has its own built-in auto-sampling, so you can start previewing results instantly. I, personally, have a hard time investing great amounts of time in de-noising my sounds because, frankly, I'd rather be doing something else. That's why I love this plug-in so much: you could easily pull it up on the mix stage, spend ten seconds turning the main knobs up and down, and have a completely legitimate result.
But, I would be doing you a disservice if I didn't let you in on the ultra-sexy options under the hood. Here are three areas in which I found the ERA-D to truly stand out.
Artifact Controls
A certain amount of artifacting (or "musical noise") is inherent in using this type of plug-in. This one, however, creates fewer artifacts than I've encountered with any other. It also contains a hidden "Advanced" side-panel (click the "Advanced" button above the de-reverberation wheel) with additional artifact control settings. You can smooth out unwanted artifacts by using the Musical Noise Reduction slider. You can also turn on/off the Impulsive Sound option which is a second smoothing algorithm designed for material with greater transients (think: drum hits). In my exhaustive use of this plug-in, I only needed to use the advanced artifact controls once: when I was aggressively de-noising and de-verbing an incredibly complex sound. Normally, I cannot imagine that you would need to use these--the de-noise and de-reverb algorithms are that good.
Signal Path Options
We've all de-noised or de-verbed a sound and thought we did an amazing job only to play it in context and realize that we had gone way too far. The makers of the ERA-D, however, understood something important: noise reduction and reverb removal often target the same frequencies. For example, if you have a recording of someone playing racquetball in a very reverberant room with a loud ventilation fan, where does the noise end and the reverb begin? In the past, that scenario would have us using two separate plug-ins with similar algorithms attacking the same material. The result: over-processing and aliasing.
The ERA-D is not the equivalent of having different plug-ins for each aspect run one after the other. Instead, it gives a choice of signal path: De-Noise, De-Verb, Cascade (serial) or Parallel. These options let you choose whether you would like one or the other alone, both in a row (with de-noising first), or both algorithms run at the same time and then summed at the end. In addition, the processing engines are programed to recognize their common ground, and then adapt accordingly to best serve the sound. In essence, they work together so that your sound emerges with a more natural "untouched" quality.
Separate Band Controls
ERA-D gives you four band controls with two great settings: range and intensity. The range is automatically set to 100% and the intensity to 50%. The range can be modified by hovering your mouse over the bottom of the spectral graph where a "100" will appear and then dragging it upward. Once it reaches 0%, that spectral band is completely unaffected by the plug-in. The intensity can be modified by turning the wheel at the top of each spectral band up or down. This affects a non-linear change in how confident the plug-in is in the noise/reverb calculations.
And now, here are a few real world audio examples.
Dialogue Example:
There are two kinds of sounds with which I would use a plug-in of this type: dialogue and sound effects. This particular audio sample is a perfect example of the type of dialogue issues with which the ERA-D can truly excel. It is from a short film filmed in rural Africa. It contains a bevy of different noises: children playing, traffic, cicadas, and general hum. In addition, the woman is already fairly off-mic. Most de-noising software I tried was able to aggressively address the background frequencies, but it also greatly affected her voice leaving her even more flat and tinny.

With so many different choices of adjustments with this plug-in--only a few of which I have mentioned in this review--ERA-D is built to support any number of workflows. There is no right or wrong way to use it. However, the manual suggests a few options to get you started. Here, I used two such options.
Basic De-Noising:
- Start with all Ranges all the way up (no processing) and the Intensities in the middle.
- Select Signal Path "De-Noise."
- Turn the main De-Noise knob until it's between 1/2 and 3/4.
- Press "link."
- Start lowering the Ranges and listen to the effect.
Advanced Joint Processing:
- Select Signal Path "Cascade."
- Start with low Ranges and medium Intensities.
- Turn the De-Noise knob clockwise until you're happy with the noise reduction.
- Work the De-Reverberation knob until you get similar results.
- Solo each band and adjust the range until the noise floor is barely audible.
- Engage Artifact Control to minimize side effects.
- Select the Signal Path "Diff" to ensure that the desired signal is minimally affected.
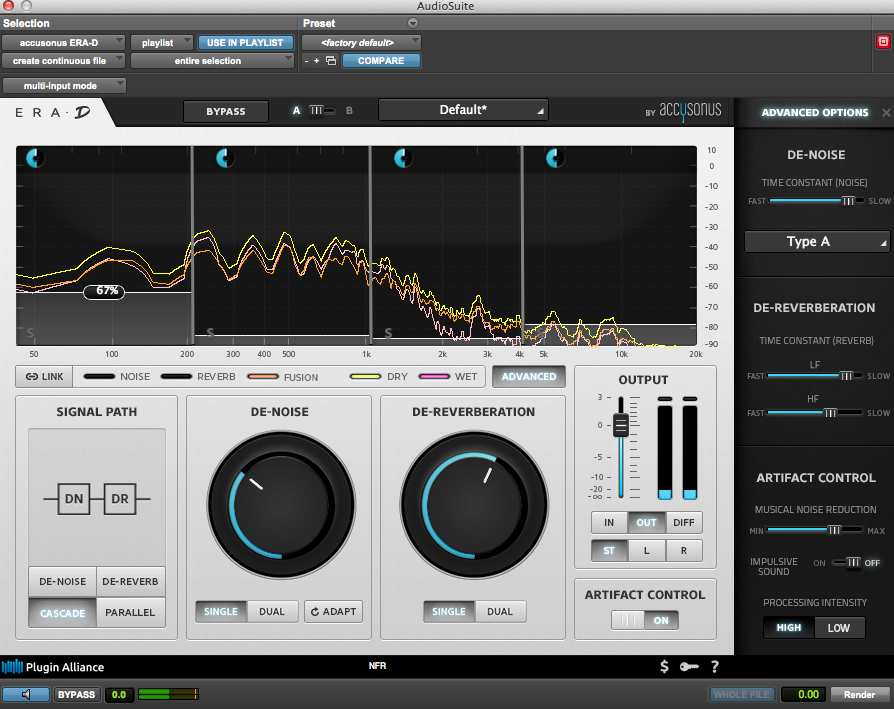
The first example, called Basic De-Noising, used only the de-nosing segment of the plug-in. As you can see, all bands were affected with the same amount of processing with the range across all frequencies set to about 76%.
However, the second Advanced Joint Processing example allowed me to process each band individually to address all of the different types of noise (traffic, children, insects, etc.). Furthermore, you'll see that the addition of the de-reverb module means that I could be much less aggressive with the main De-Noise control. Finally, this amount of processing across the spectrum did cause a small amount of artifacts to pop into the sample. I opened the advanced pane to the right and adjusted the artifact controls until I was happy with the result. Although this process took more time (maybe two minutes instead of ten seconds), you'll find that the results were certainly worth the investment.
Sound Effect Example:
Since I experimented with the methods for noise removal on the dialogue example, I wanted to illustrate the reverberation removal techniques with a sound effect. We all have certain sounds in our libraries which are huge and amazing, but alas have so much room information that they're ultimately unusable.
Here, I worked on a fabulous castle door sound with both the manual's Basic De-Reverberation technique and my own Difference Method.


Basic De-Reverberation:
- Start with the Ranges all the way down (maximum) and the Intensities in the middle.
- Select the signal path "De-Reverb."
- Turn the main De-Reverb clockwise and listen to the effect.
Difference Method:
- Begin by performing the Basic De-Reverberation technique.
- In the "Output" section, set the output to "Diff." This will allow you to hear what you're removing rather than what you're left with.
- Adjust the De-Reverb knob until just before you start to hear the meat of the sound (especially avoid hearing the transient clearly).
- Switch the "Output" back to "Out" to hear the effect.
These two methods are essentially the same with just one added step. But, from the position of the De-Reverberation knob and the spectral analysis in the photos, you can see that this additional step of monitoring the difference allowed me to make a more informed decision about how much to remove.
You can download a fully functional 14-day trial version here, and try it out for yourself!
Watch this BBP tutorial so see the methods described above in action: