

WRITTEN BY JESSEY DRAKE
Sound Effects Editor, Re-recording Mixer
BOOM BOX POST
I’ve been very fortunate to have the unique opportunity to see both sides of the post production coin, if you will. Being this sort of sound effects editor/re-recording mixer hybrid has really propelled my understanding of the post production sound process and has expanded the depth at which I create that sound tenfold. I’ve come to find that the two roles compliment each other and I find myself using skills from one discipline in that of the other (and vice versa) on a daily basis. First and foremost, I will always have an affinity for sound effects editing. The single most mixer-related skill that has improved that affinity, and one that I cannot edit without, is panning automation. More specifically, panning automation in a 5.1 or surround space.
5.1 CONCEPTS
- Panning automation, by definition is automating where we are hearing a sound in the aural space, by writing that information into Pro Tools or any other DAW (Digital Audio Workstation).
- 5.1 panning and 2.0 panning do have similarities however every mono file in 5.1, comes out of the center channel. This in turn forces us to find clarity by using panning automation.
- There are six discreet channels in 5.1 audio. Left, Center, Right, Left Surround, Right Surround and LFE
- With panning automation you can use these six discreet channels to pull sound away from the center channel in order to make way for the dialogue to come through your mix.
HOW TO
- Before any automation is written please make sure you are in touch ortouch/latch automation. That is found here on your audio tracks:

There are three ways that I find useful to write panning automation:
- Preview Mode: In your automation window click the Preview mode at the bottom of the window (it will turn green when on). Using preview mode like the name suggests, allows you to preview the automation you are about to write before actually committing it to your session. While in preview mode highlight the portion of the track you want to write automation on, bring up the panning window, adjust any of the panning controls to your desired panning position, and to finally commit your automation, click the middle double arrow button under the Manual Write section of the automation window. It’s called the Write to Selection button. This is useful for writing automation to large areas of your session or entire files that you want to all have the same automation.
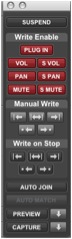
- Manual Write: Bring up the panning view in your Edit Window and manually pull the panning parameters with the grabber tool. This is useful particularly when you just want to quickly write in some Left or Right panning automation. Anything beyond that, like surround panning, when you manually write it gets pretty dicey.

- Touch Automation: In your panning window or using the pan pots on your control surface, you can write live panning automation, like you would write volume automation with a fader. This is useful when you have action happening on the screen that flies all over the place. You are then able to chase the action with your automation moves.
BASIC PANNING GUIDELINES
Generally speaking, there are some basic guidelines to stick by when it comes to writing panning automation. However, it should be pointed out that every mixer is different, every client has varying opinions on how the placement of a sound affects him or her and most importantly every show or film is approached differently when it comes to panning. For instance, you wouldn’t approach the aural space in the same way on show like the The Loud House, as you would on a show like Teenage Mutant Ninja Turtles. Two completely different shows that deserve their own spatial treatment. So with that here are some general rules to mix by:
Left/Right Width:
- Dialogue: Taking the dialogue out of the center can be very disconcerting. A very extreme instance would be taking the dialogue up to 30-40 percent left or right. That would be a case of the character being completely off screen and you need to draw attention to it. However, a more comfortable number would most likely be somewhere in the ballpark of less than 20 percent each way.
- Foley (Footsteps): Footsteps are so often not heard and because of that I like to give them a little life and completely take them out left or right. So 100% left or right when the character is walking from completely off screen or walking completely off screen. Of course there are varying degrees of this, but that is determined by how close or far they are to the frame of picture.
- Sound Effects: This has to do with taste. I generally take sound effects that are completely off screen somewhere in the 50-75 percent range. Anything more than that is for extreme cases and for dramatic purposes. Anything less than that doesn’t really come across too well.
Surround Depth:
- Dialogue: THERE BETTER NOT BE ANY DIALOGUE IN THE SURROUNDS!
- Music & Backgrounds: I like pulling the music and the backgrounds one square back on the panning window. What this does, is it fully envelops the listener. It brings the audience into that scene and it makes the music become more than just music. It becomes an ancillary character and therefore adds another layer to the story.

- Sound Effects: Same thing with sound effects. Pulling bigger stereo sound effect moments, like explosions or earthquakes back one square, makes that moment fill the space and thus making it feel larger than it is. For mono sound effects, generally when those effects are going into the rears, I would only pull them back about one square as well. Anything more than that should be used for dramatic purposes.
Center Percentage:
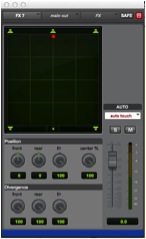
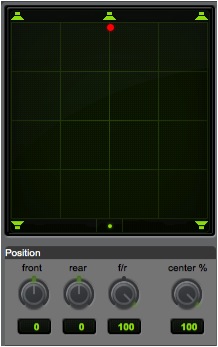
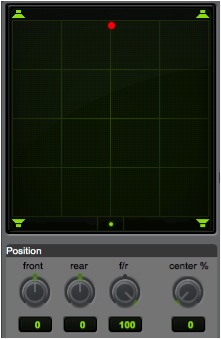
- Like I stated earlier, 5.1 panning is all about finding clarity and most importantly making room for the dialogue since all mono sound effects are coming out of the center channel. A really neat trick in 5.1 panning is to essentially take that mono effect and route it with panning to both the left and right channels. We do this with the center percentage parameter in the Pan Window. As you can see in the first picture below the mono effect is 100% coming out of the center channel and in the second picture it is 0% coming out of the center channel. Meaning that it is now equally coming out of the Left and Right channels, making way for the dialogue to come clearly out of the center channel. This can be used in varying degrees as well. It is highly useful with backgrounds that are mono files and for sound effects like rivers or streams that seem to take up much of the speaking range.
LFE channel:
- It’s very important to note that a discreet LFE channel in 5.1 does wonders for the intensity of a mix. However, sending or putting sound effects that do not contain low-end frequencies will do no good. Sound effects wise, sub sweeteners are your best bet to be added to do just that, sweeten the bigger action moments on screen.
All in all, 5.1 panning and 5.1 mixing have done wonders for my own editorial and mixing. They have become a cornerstone of how I create. I suggest every editor to kind of take a stab at it. But a few words of caution, discuss implementing panning automation with your supervisor or mixer before just sending it off to them and of course if you do not know what you are doing leave it alone until you do. Practice does get you closer to perfect.